Pay Statements
The Pay Statement APIs enable you to get up and running with our Pay Statement product line.
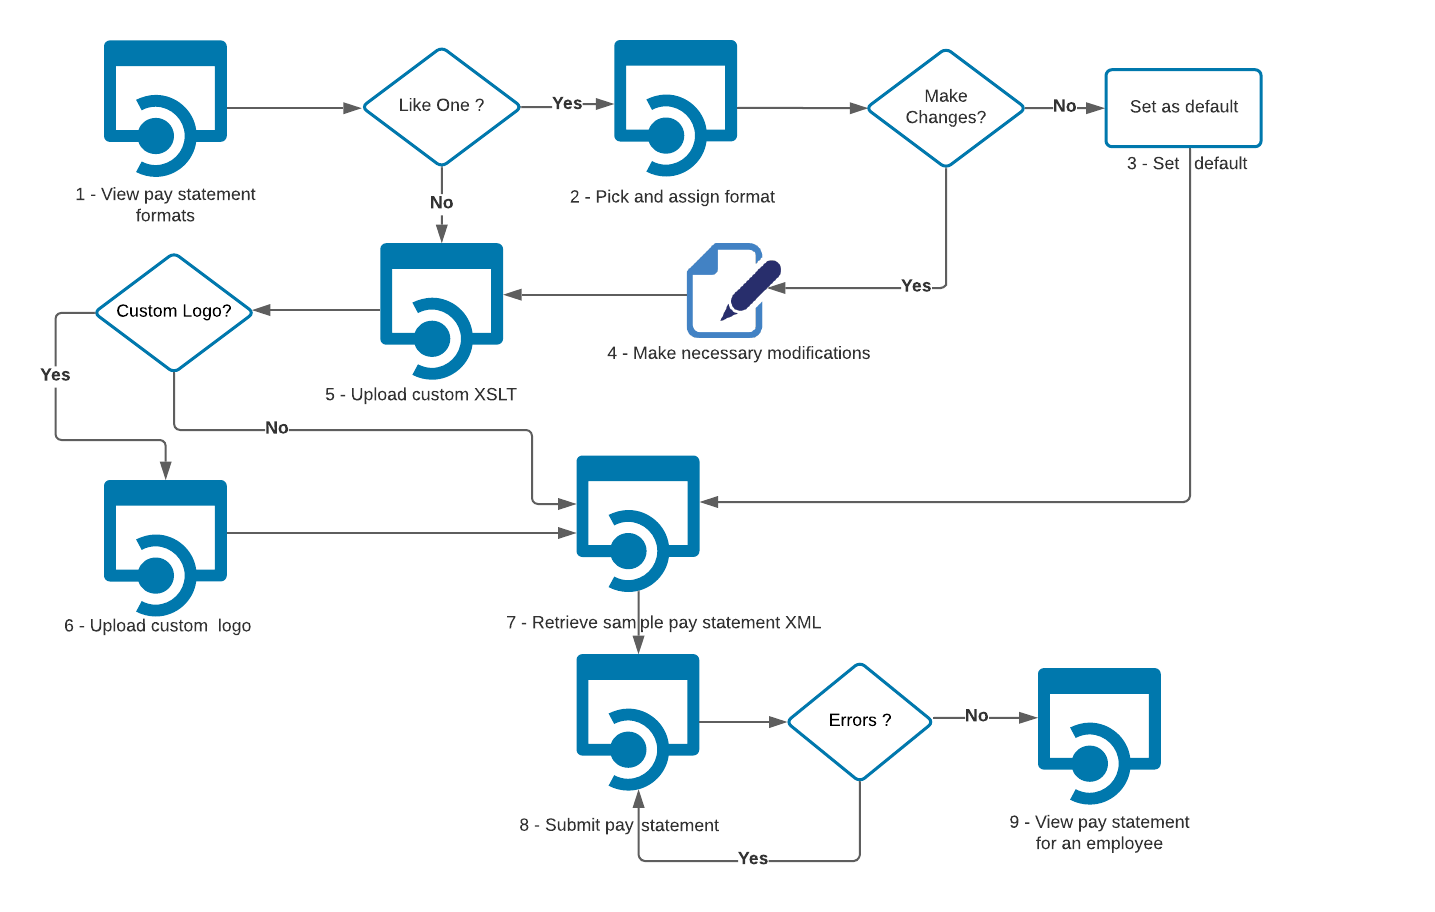
Below is the work flow that we offer our clients with APIs. Please scroll below for an explanation on each numbered step. You may access our sample Pay Statement XML format using Step 7.
Every CIC Plus endpoint will require two headers: authorization and a subscription key. The header information is as follows:
Headers
Content-Type: application/json
Ocp-Apim-Subscription-Key: {subscription key}
Authorization: bearer {token}
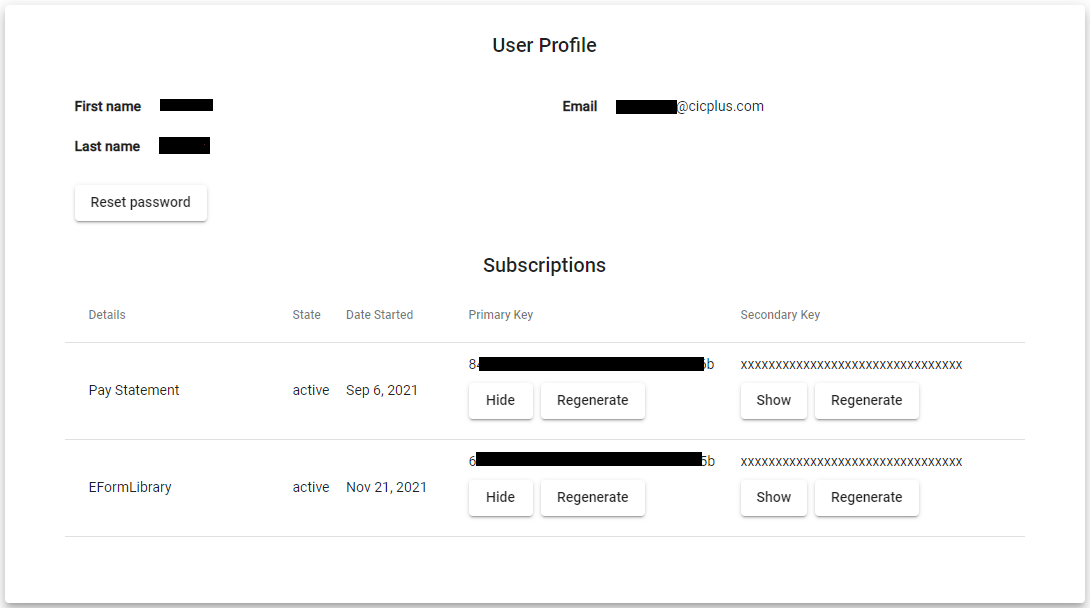
You can learn how to get an authorization token on this page. Subscription key can be found on the Profile page:
Available Pay Statement Endpoint Actions
1. GET Pay Statement formats:
This request will return a list of all the Pay Statement sample formats that CIC Plus offers its clients for a specified culture. We currently offer 3 formats - English (en-US), French (fr-CA) and Spanish (es-MX).
Below is the example GET request sent to the /api/paystatementadmin/samples endpoint
GET https://cloud.paperlessemployee.com/api/paystatementadmin/samples
*Note
All urls mentioned in this document are only samples and the actual url will be available once the client subscribes to the product.
The response will contain the status code. If the request is successful, then the name and description of all the pay statement formats that CIC Plus offers will be displayed. These can then be downloaded and viewed in pdf format.
200 OK
Content-Type: application/json
Response    :
{
 Name: "paystatementformat1", Description: "this is what the format does"
}
2. POST Pick a format and assign to a client :
This request will assign the chosen Pay Statement Format to the client
Below is the example POST request sent to the /api/paystatementadmin/assignment endpoint
POST https://cloud.paperlessemployee.com/api/paystatementadmin/assignment?sampleFormatName=sample_formatName_fromStep1&companyId=users_companyId
The response will contain the status code, and if successful, the selected pay statement format will be assigned to the client. Appropriate error messages will be displayed in case of errors.
200 OK
Content-Type: application/json
Response    : List of success or errors
3. Set default
If you are happy with one of our standard formats, then assigning this via Step 2 makes this your default pay statement format. You can skip ahead to Step 6.
4. Make necessary modifications
If you would like to make modifications to one of the standard pay statement formats from Step 1, then feel free to download the sample XSLT using the following endpoint:
GET https://cloud.paperlessemployee.com/api/paystatementadmin/samples/transform?sampleformatname=sample_formatName_fromStep1
5. POST Upload custom XSLT
Once you have customized one of the standard pay statement formats from Step 1 then use make this request to upload that XSLT into the CIC Plus pay statement system.
Below is the example POST request sent to the /api/paystatementadmin/upload/transform endpoint
POST https://cloud.paperlessemployee.com/api/paystatementadmin/upload/transform?name=nameOfTransform&defaultCulture=en-US
The body will contain the xslt file.
The response will contain the status code, and if successful, the uploaded xslt will be assigned to the client. Appropriate error messages will be displayed in case of errors.
200 OK
Content-Type: application/json
Response    : Returns OK or list of errors
6. POST Upload custom Logo
This request allows you to upload a custom logo that you would like to display on your pay statement.
Below is the example POST request sent to the /api/paystatementadmin/upload/logo endpoint
POST https://cloud.paperlessemployee.com/api/paystatementadmin/upload/logo
The body will contain the logo file and companyUrlSuffix.
The response will contain the status code, and if successful, the uploaded logo will be resized to our standard size and assigned to the client. Appropriate error messages will be displayed in case of errors
200 OK
Content-Type: application/json
Response    : Returns OK or list of errors
7. GET Retrieve Sample Pay Statement PDF
This request allows you to retrieve and download sample CIC Plus Pay Statement PDF
Below is the example GET request sent to the /api/paystatementadmin/samples/pdf endpoint
GET https://cloud.paperlessemployee.com/api/paystatementadmin/samples/pdf
The response will contain the status code, and if successful, you can download the sample PRF file that CIC Plus offers. You may customize as per your needs.
200 OK
Content-Type: application/json
Response    : Returns the sample pay statement XML
8. POST Submit Pay Statement Source Data XML File
This request allows you to submit your custom pay statement XML to the CIC Plus Pay Statement system.
Below is the example POST request sent to the /api/paystatementadmin/upload/source-data endpoint
POST https://cloud.paperlessemployee.com/api/paystatementadmin/upload/source-data?releaseDate=date_paystatement_becomes_available
The request body will contain the source data file
The response will contain the status code. If your XML contains errors then appropriate error messages will be displayed. You may re-upload the pay statement XML after fixing those errors.
200 OK
Content-Type: application/json
Response    : Returns Upload Successful or list of errors
9. Approve Pay Statements
Approving Pay Statements is a three step process:
GET request to view all the Pay Statement files uploaded and waiting for an approval.
GET request to view the specific file details
POST request to approve the selected file
Below are the examples for each step:
GET https://cloud.paperlessemployee.com/api/PayStatement/source-data/awaiting-approval
GET https://cloud.paperlessemployee.com/api/PayStatement/source-data/{fileId}/detailsPOST https://cloud.paperlessemployee.com/api/PayStatement/source-data/{fileId}/approveThe response will contain the status code. You can download this pay statement.
200 OK
Content-Type: application/pdf
Response    : <PayStatement_of_the_specified_employee>.pdf
10. GET View Last Pay Statement for an employee
This request allows you to view the last pay statement of a specified employee provided you have the appropriate permissions.
Below is the example GET request sent to the /api/paystatement/most-recent/employee-id
GET https://cloud.paperlessemployee.com/api/paystatement/most-recent/employee-id?6c849aa8-b7ab-4c3d-8c05-20270ccb699c
We offer an additional endpoint that will allow an employee to view their pay statement history year-to-date :
GET https://cloud.paperlessemployee.com/api/paystatement/all-for-year/employee-id?6c849aa8-b7ab-4c3d-8c05-20270ccb699c&checkYear&year_for_which_we_need_history&page?paging&itemsPerPage?number_of_Items_per_page&showunapproved?true_or_false&showbeforeavailable?true_or_false